If you’ve ever encountered the error message, “The request could not be performed I/O error,” you’re not alone. I/O errors, short for Input/Output errors, are a common computer hiccup that can leave Windows users scratching their heads. In this article, we’ll demystify what an I/O device error is, explore the common scenarios in which it arises, and most importantly, equip you with the knowledge to resolve this thorny problem. Let’s dive in!
Part 1: What is an i/o Device Error?
An I/O device error, often referred to as an “I/O error,” is a computer problem that occurs when your computer can’t properly communicate with a connected device. It means that your computer has failed to read data from the device or write data to it. This error can be caused by various reasons like a faulty device or a damaged cable. Understanding the causes of an I/O Device Error before learning how to resolve it will help you address the issue more quickly and effectively.
Part 2: Common Reasons behind I/O error
Now, you no longer worry about what is an i/o Device Error. But, why does this error occur? Here are some common causes:
- Loose or damaged cables connecting the device to the computer.
- A malfunctioning USB port.
- Your storage device itself may be failing.
- The drivers for the device are outdated or incompatible with the operating system.
- Physical damage to your storage device, such as bad sectors.
- The file system on your storage device is corrupted.
- Virus or Malware.
Fret not! There are various methods to fix I/O device error easily and quickly.
Part 3: Quick Fixes for I/O Device Error
When you face the error message, “The request could not be performed I/O error,” stay clam and perform some basic checks:
- Sometimes, a simple restart can resolve I/O errors caused by temporary software glitches.
- Make sure that all cables connecting the device to the computer are secure and undamaged.
- If possible, consider testing your device on another computer.
Bonus Tip: Recover Data from Your Corrupted Device Effortlessly
If your external disk are experiencing an I/O device error, there’s a risk of losing important data due to potential damage or corruption. However, 4DDiG Data Recovery offers a simple and effective solution for recovering data from a faulty hard drive. This user-friendly tool is specifically designed to recover data from drives that have become inaccessible due to I/O errors. Here are its key features:
- Easily recover your lost or inaccessible data without the need for technical expertise.
- Support recovering data from various devices, such as USB, SD card, external hard drive, Windows, Mac, etc.
- Support over than 2000 data types like photos, videos, audio, documents and more.
- High success rate and 100% security.
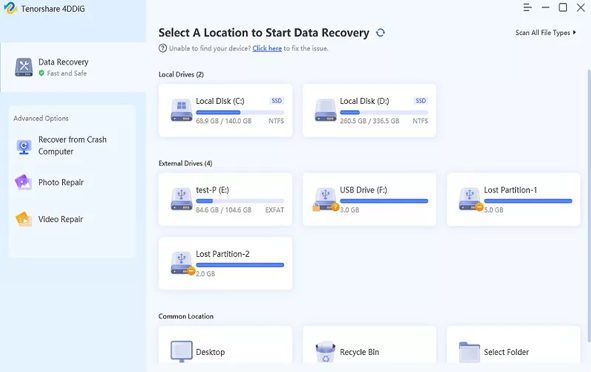
Step 1: Start by downloading and installing Tenorshare 4DDiG Windows Data Recovery. Then, run the program and connect your problematic external hard drive to your computer. Next, select the drive and click “Scan” to begin the process.
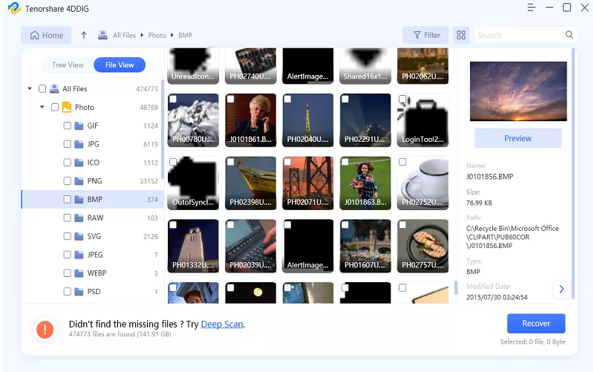
Step 2: Once you hit “Scan,” 4DDiG will swiftly scan your chosen hard drive to find the lost data. You can keep an eye on the progress, and you have the flexibility to pause or stop the scanning whenever you wish.
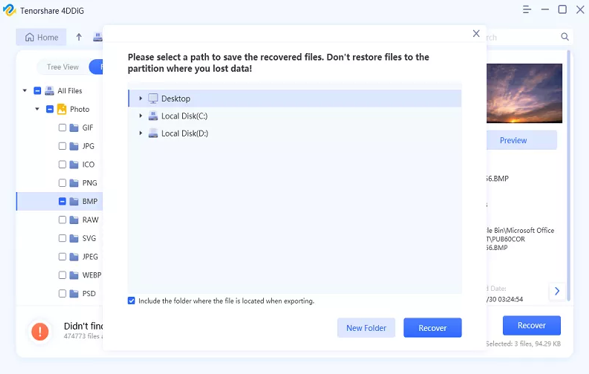
Step 3: Finally, simply select the files you want to recover and click on the “Recover” button. A dialog box will appear, prompting you to choose where you want to save the recovered files.
Part 4: Windows Built-in Tools to Fix I/O Device Error
4.1 Update or Reinstall disk drivers
Outdated or incompatible disk drivers can be the culprit of I/O errors. In such cases, a simple update or reinstall of the disk driver can easily fix the issue. Here is how:
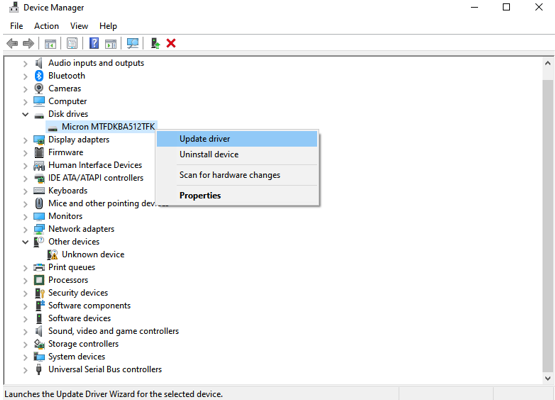
Step 1: You can type “Device Manager” in the Windows search bar and click on the app when it appears.
Step 2: Expand the “Disk drives” category and right-click on the disk drive that you want to update.
Step 3: Choose ‘Update driver,’ and if needed, you can also reinstall your disk drive from this option.
Step 4: Select “Search automatically for updated driver software” and Windows will search for the latest driver online.
4.2 Use CHKDSK to Repair Disk Errors
If the error message ‘the request could not be performed i/o error’ still appears, you can try using command-line tools to repair disk errors.
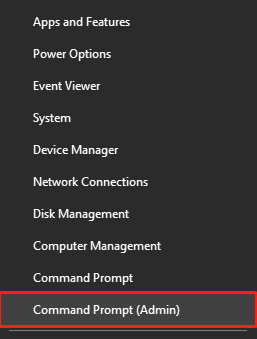
Step 1: Begin by right-clicking on the Start button and choose “Command Prompt (Admin).”
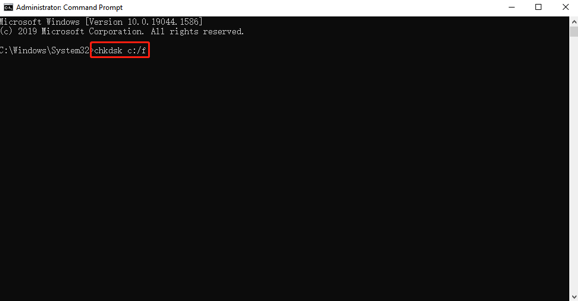
Step 2: Next, enter the command “chkdsk [drive letter]: /f” to initiate the checking and repairing process.
4.3 Change Drive Letter and Paths
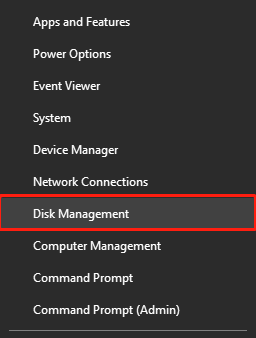
Step 1: Connect your external hard disk to the computer. Press Win + X on your keyboard and choose “Disk Management.”
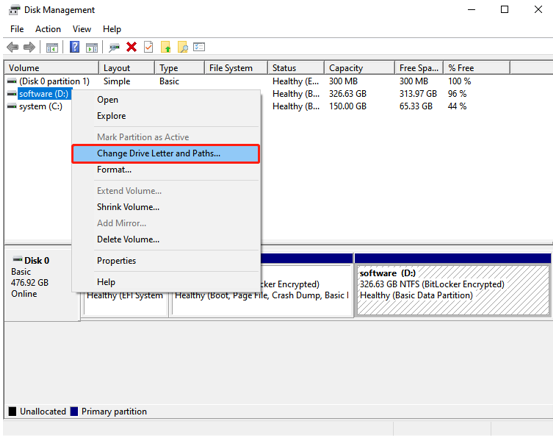
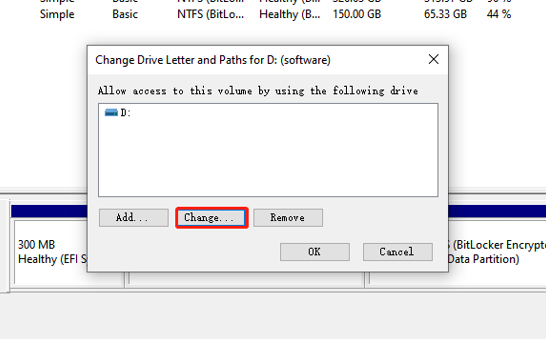
Step 2: Locate your problematic disk, perform a right-click on it, and then opt for “Change Drive Letter and Paths…” in the menu.
Step 3: Click the “Change” button.
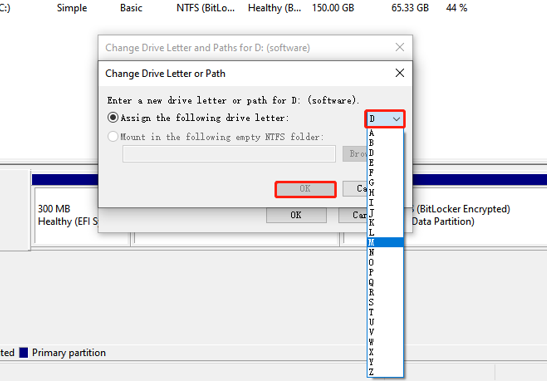
Step 4: A new window will pop up. Choose a different, unused drive letter from the dropdown menu, and then press “OK” to confirm your selection.
Part 5: Possible Ways to Fix I/O Device Error
5.1 Adjust your DMA Settings
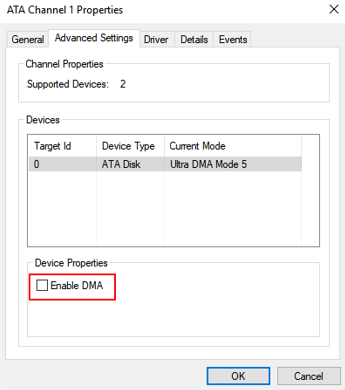
When your device cannot handle the transfer mode that Windows attempts to use, it’s not surprising to encounter the error message “The request could not be performed I/O error.”
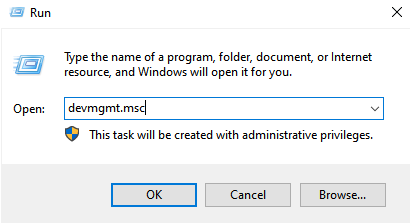
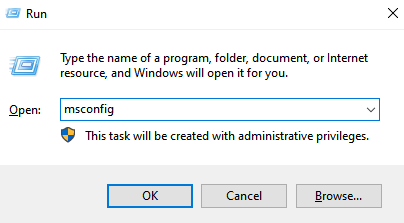
Step 1: Open the Run dialog box by pressing “Win + R.” Then, type “msconfig” and press Enter.
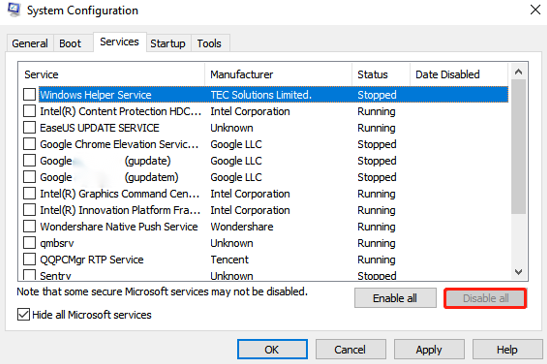
Step 2: Move to the “Services” tab and select “Hide all Microsoft services.”
Step 3: Click the “Disable all” button to turn off all non-Microsoft services.
Step 4: Click “OK” to apply this change. Restart your PC to check if the I/O device error persists.
5.2 Clean Boot
A clean boot of your PC disables unnecessary startup programs and services, which helps in resolving I/O device errors caused by software conflicts. Although it’s not a guaranteed solution, you can give it a try.
Step 1: Press “Win + R” to open the Run dialog box. Then, type “msconfig” and press Enter.
Step 2: Go to the “Services” tab and check the box that says “Hide all Microsoft services.”
Step 3: Click the “Disable all” button to disable all non-Microsoft services.
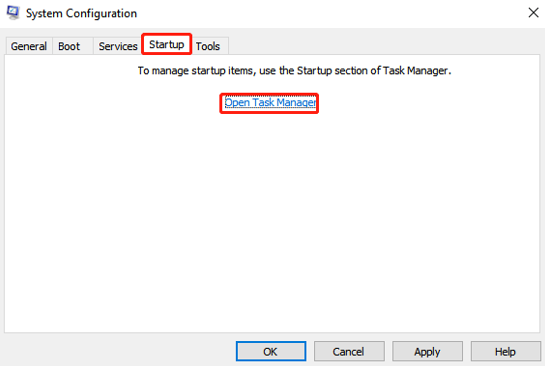
Step 4: Now, go to the “Startup” tab, click “Open Task Manager,” and disable all startup items.
Step 5: Close Task Manager and click “OK.” Restart your computer when everything is done.
5.3 Seek Professional Help
If none of the above solutions resolve the I/O error, there may be a hardware issue with either the device or your computer’s hardware. It’s important to note that dealing with hardware issues may require specialized knowledge and tools. Therefore, if you’re not sure how to do this, or are concerned about damaging your hardware, it’s best to seek professional help to avoid further problems. Additionally, if the device is still under warranty, consider contacting the manufacturer for support with repair or replacement.
Part 6: How to prevent an I/O error on your external hard drive?
Here are some tips to help you prevent I/O errors:
- Eject or safely remove your external hard drive from your computer before unplugging it.
- Always Keep your disk drivers up to date.
- Create regular backups of your important data. We highly recommend using cloud storage.
- Treat your external hard drive gently. Avoid dropping or bumping it.
- Using high-quality cables is always a wise choice.
Conclusion
What is an i/o device error? How to fix “The request could not be performed I/O device error”? Now, you have gained enough confidence and skills to address this issue. But before you begin, make sure to recover any important data from the affected drive. 4DDiG Data Recovery is the ideal choice for you.

